What Exactly Are Mould Mites, and Why Should Singaporeans Care?
In Singapore’s humid climate, mould is a common household problem that often goes unnoticed until it causes health issues or damages property. One lesser-known culprit contributing to this problem is mould mites-tiny creatures that thrive in damp, mouldy environments. Understanding what mould mites are and their impact on your home is the first step toward a healthier living space.
Mould mites are microscopic arachnids that feed on mould spores. While they themselves don’t bite or harm humans directly, their presence signals a mould problem, which can exacerbate allergies and respiratory conditions, especially in Singapore where humidity levels often exceed 80%. For families living in compact spaces or older flats, mould mites can contribute to discomfort and potentially worsen asthma or eczema symptoms.
How Do Mould Mites Get Into Your Home, and Why Are They Hard to Spot?
Because mould mites are invisible to the naked eye, many homeowners remain unaware of their infestation. They typically infest areas with persistent moisture – think behind kitchen cabinets, bathroom corners, or air conditioning units, all common in Singapore’s climate. These mites reproduce rapidly wherever mould is present, making it essential to address the root cause: dampness and mould growth.
If you notice a musty smell, visible mould patches, or unexplained allergic reactions, it’s often a sign that mould mites might be present. Unlike larger pests, mould mites don’t leave obvious traces, which makes professional advice and treatment critical to effective removal.
Wondering How to Get Rid of Mould Mites? Here’s What Works
If you’re struggling with mould mites, the good news is that eliminating mould and controlling moisture will significantly reduce their numbers. For those looking for practical, effective solutions, learning how to get rid of mould mites is essential.
Firstly, controlling indoor humidity is key. Singapore’s tropical climate makes this challenging, but using dehumidifiers, improving ventilation, and fixing leaks can help keep moisture levels below 60%, a threshold unfavourable for mould and mites.
Secondly, thorough cleaning with mould-specific detergents or professional-grade fungicides helps remove the mould food source for mites. Simple household cleaning is often insufficient, especially in hidden corners or air-conditioning ducts where mould thrives.
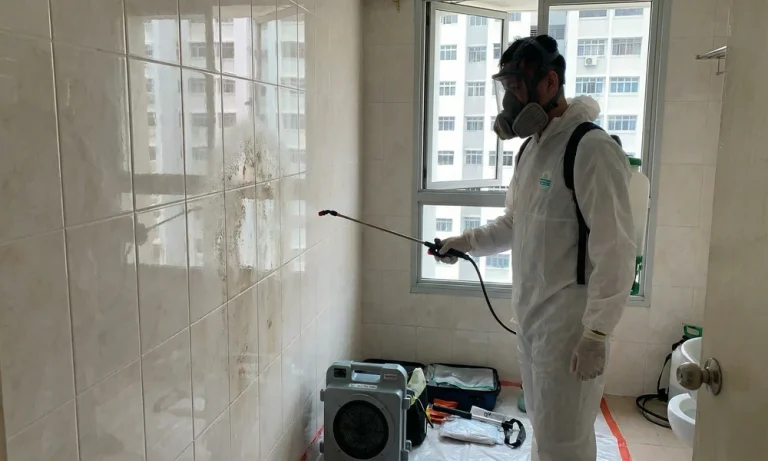
Finally, consider professional mould removal services if the infestation covers a large area or persists despite your efforts. Experts use specialized equipment and treatments tailored to Singapore’s humid environment, ensuring mould and mould mites are eradicated safely and effectively.
How Much Does Mould Removal Cost in Singapore? Breaking Down the Price
When considering professional help, one of the biggest concerns is affordability. Many Singaporeans ask about the mould removal Singapore price, and while it varies depending on the severity and area affected, understanding what influences these costs can help you make informed decisions.
Mould removal pricing in Singapore typically depends on factors such as the size of the affected area, the type of mould, and whether there are structural repairs needed after treatment. For minor infestations, costs may be relatively modest, but extensive mould problems that require specialist intervention and multiple visits can be pricier.
It’s important to remember that investing in professional mould removal can save you money in the long run by preventing property damage, mitigating health risks, and reducing the need for repeated treatments. Reputable companies like Mouldgone provide transparent pricing and tailor their services to your home’s specific needs, ensuring effective remediation without overspending.
What Makes Professional Mould Removal in Singapore Different?
Singapore’s unique climate demands expertise in dealing with mould and its related pests. Professional mould removal companies bring experience and knowledge about local conditions, common mould species, and effective mitigation strategies that work best here.
Beyond just cleaning, experts conduct thorough inspections, moisture assessments, and recommend long-term solutions such as improved ventilation systems or waterproofing measures suitable for Singapore’s environment. This comprehensive approach ensures that mould and mould mites are not just temporarily removed but prevented from returning.
Choosing a trusted mould removal provider also offers peace of mind. Licensed professionals follow safety protocols, use eco-friendly and non-toxic treatments, and provide guarantees on their work. This level of trustworthiness and authority is crucial when dealing with health-impacting issues like mould infestations.
How Can You Prevent Mould Mites from Coming Back?
After successful mould removal, prevention becomes the priority. Singaporeans should maintain good home ventilation, especially in areas prone to moisture like bathrooms, kitchens, and laundry rooms. Installing extractor fans, using air purifiers, and regularly inspecting common mould hotspots can make a big difference.
Regular cleaning routines with mould-inhibiting products help keep spore levels low, reducing the chance for mould mites to establish themselves. Additionally, controlling indoor humidity with air conditioning or dehumidifiers is an ongoing effort in Singapore’s tropical climate.
By combining these proactive measures with expert advice, you can create a healthier indoor environment free from mould and mould mites.
Final Thoughts: Taking Action Against Mould Mites Is Easier Than You Think
Living in Singapore means dealing with humidity and mould challenges more often than elsewhere. Understanding the role of mould mites and learning effective ways to manage them empowers you to protect your home and health. If you’re unsure about the extent of your problem or want professional support, exploring how to get rid of mould mites and checking mould removal Singapore price can guide you to the right solution.
Taking early action not only safeguards your property but also enhances your family’s wellbeing-something every Singaporean deserves in their home.
A wheelchair ramp provides an essential route into and around a feature for wheelchair users and the public with mobility limitations. Because ramps are commonly vulnerable to pressure, weather, humidity, and wear, minor defects can expand over time.
Some minor issues may be easy to address, but serious issues can compromise balance and approachability. Ignoring them can make the ramp troublesome to use and may cause more costly wheelchair ramp repair.
5 Wheelchair Ramp Repairs
Here are five wheelchair ramp repairs that homeowners and property managers should never ignore.
1. Loose or Damaged Handrails
Handrails provide valuable support when people enter, exit, or move alongside a ramp. Do not assume that constricting individual visible twists will solve the problem. The promoting posts, brackets, connections, and circumscribing structure should also be examined.
2. Structural Damage
The ramp surface needs to be resistant and reasonably even along the whole of its length. Cracks, dents, broken boards, or broken divisions can create obstacles for wheelchair users.
Concrete ramps can develop cracks on account of age, ground activity, dampness, or climate changes. Wooden ramps may develop broken or damaged boards, while metal ramps can develop dents, corrosion, or fundamental decay.
3. Slippery Surfaces
A ramp can become hazardous when its surface not any more specifies adequate friction. Hire an expert who can detect the slippery surface and fix the issue. You can also hire an expert to get advice on wheelchair ramp maintenance.
4. Rust
Moisture can equally damage ramp materials, specifically when perpetuation is ignored. Metal wheelchair ramps may develop rust or disintegration at intersections, fasteners, supports, and other unprotected areas. If disintegration worsens, it can impair structural parts.
Wooden ramps face various risks. However, extensive structural damage may require replacement of affected parts. Addressing these questions early can help prevent a relatively manageable repair from becoming a major project.
5. Uneven or Unstable Sections
Ground drive, foundation changes, damaged supports, loose connections, and deterioration of construction materials can all influence ramp cohesion. For modular or metal ramps, loose connections can enhance motion. Concrete ramps may be affected by settlement or changes beneath the structure.
Do not continue utilizing a clearly unstable incline simply cause the problem performs narrow. A professional can determine whether the issue includes the surface, supports, foundations, or related components.
Why Prompt Wheelchair Ramp Repairs Matter
Wheelchair ramp repairs are not only about maintaining the appearance. A broken ramp can influence accessibility, security, and safe movement. Delaying repairs can likewise allow minor defects to worsen into more extensive problems.
For example, a limited area of corrosion can spread, while a minor crack may evolve and influence surrounding areas. Regular inspections determine a freedom to label these issues early.
Hire an Expert
Some primary maintenance tasks, like removing leaves and soil, may suit a property keeper. However, structural repairs should be approached carefully. Professional wheelchair ramp service can evaluate the whole structure rather than focusing only on the apparent defect. This is particularly important when there are damaged supports, ambiguous handrails, significant corrosion, cracked concrete, or doubtful sections.
Conclusion
A wheelchair ramp is an important accessibility feature, so signs of decay should never be missed. Loose handrails, structural damage, smooth surfaces, decomposition or rot, and doubtful portions can all influence how carefully and comfortably a ramp may be used.
There is a certain peace of mind that comes from setting a hot pan directly on your countertop without flinching. In the world of kitchen design, few qualities matter more than heat resistance, and that’s where Quartz Blanc porcelain slabs show their true value.
What Makes Quartz Blanc Porcelain Slabs Stand Out for Kitchens?
Quartz Blanc porcelain slabs are engineered from premium materials and designed to outperform traditional options on every critical front. Unlike wood, laminate, or some natural stones, these slabs resist stains, scratches, and, most notably, high heat. Their dense, non-porous surface means everyday kitchen mishaps, from boiling water spills to red wine stains, don’t leave a mark. Durability and elegance rarely come together so effortlessly.
What is Quartz Blanc Porcelain and How Does It Compare to Other Materials?
While granite and marble have long been touted for their natural beauty, they often require sealing and regular maintenance to preserve their look. In contrast, Quartz Blanc porcelain offers the refined appearance of stone, but with far tougher properties. Compared to quartz or laminate, it brings a level of heat and stain resistance that simply outlasts the competition.
How Does Its Appearance Enhance Kitchen Design?
The range of patterns and finishes is nearly endless. Want the glamour of marble without the upkeep? Porcelain mimics the veining and depth of natural stone with astonishing realism, giving you a countertop that’s as beautiful as it is functional.
Why Is Heat Resistance Crucial for Kitchen Countertops?
A kitchen is a workspace first, and the tools of the trade, pots, pans, appliances, generate serious heat. If your countertops can’t handle it, you may face unsightly scorch marks, warping, or even cracks.
What Are the Risks of Using Heat-Sensitive Materials in Kitchens?
Materials like laminated surfaces or even some engineered stones can discolor or deform under high temperatures. This not only ruins the look of your kitchen but may compromise the integrity of your work area over time.
How Does Quartz Blanc Porcelain Withstand High Temperatures?
Porcelain is fired at extreme temperatures during manufacturing, so it shrugs off the heat of freshly removed cookware without a hitch. This resilience means you can cook, bake, and roast with confidence, knowing your surfaces are safe.
How Durable Are Quartz Blanc Porcelain Slabs Beyond Heat Resistance?
Heat is just one test. Kitchens are high-traffic spaces where accidents happen, and longevity is paramount.
Are They Scratch, Stain, and Chip Resistant?
The dense structure of porcelain means it resists scratches from knives, accidental drops, and everyday wear. Unlike softer stones, it doesn’t chip easily. The non-porous finish also shrugs off most household stains, from coffee to tomato sauce.
How Do They Perform Over Time in Busy Kitchens?
These slabs maintain their integrity and beauty for years. The finish doesn’t dull, and even after constant use, the surface stays smooth and attractive, making them a top pick for family kitchens.
What Maintenance Does Quartz Blanc Porcelain Require?
When the cooking is over, easy cleanup matters just as much as resilience.
How Easy Is It to Clean and Maintain These Slabs?
A damp cloth and mild soap take care of most spills. Because the surface is non-porous, bacteria and moisture don’t penetrate, making it a hygienic choice. No need for sealing, polishing, or specialty cleaners.
Does Heat Resistance Affect Long-Term Care?
In fact, it simplifies it. With no worry of heat stains or burns, you can maintain the countertops’ pristine look with minimal effort.
Can Quartz Blanc Porcelain Slabs Mimic the Look of Natural Stone?
Porcelain’s ability to replicate natural stone is nothing short of impressive. Designs range from classic marbles to modern minimalist shades.
How Realistic Are Their Marble and Stone Patterns?
Thanks to advanced digital printing, the veining and depth are strikingly authentic. The result is all the charm of stone, without the headaches.
What Design Flexibility Do They Offer in Kitchen Remodeling?
Whether you dream of a seamless waterfall island or a statement backsplash, these slabs can be cut to size and installed with minimal seams. The design options are virtually limitless.
How Does Quartz Blanc Porcelain Enhance Kitchen Safety and Functionality?
Safety and function are inseparable in kitchen design.
Does Heat Resistance Improve Kitchen Safety?
Absolutely. The ability to place hot cookware directly on the surface reduces the risk of burns or accidents from scrambling for trivets and boards. No thermal shock means no unexpected cracks.
What Practical Benefits Do Homeowners Gain?
Alongside safety, you get a surface that stays attractive and functional in the face of daily challenges, scratches, stains, and heat. For anyone who loves to cook, that means less stress and more enjoyment in the kitchen.
What Are the Installation Considerations and Costs?
Quartz Blanc porcelain does require professional installation, and up-front costs may be higher than some alternatives.
How Does Installation of Quartz Blanc Porcelain Compare to Other Surfaces?
Due to their large size and density, these slabs demand expert handling. However, the result is a seamless look that’s nearly impossible to replicate with tile or modular materials.
Are Higher Initial Costs Offset by Long-Term Value?
Absolutely. With little need for repairs, resealing, or replacement, most homeowners see long-term savings. Durability and easy maintenance add even more value over time.
Where Else Can Quartz Blanc Porcelain Slabs Be Used in the Home?
Their versatility is a major draw.
Beyond Countertops: Versatility in Bathrooms, Fireplaces, and Walls
From bathroom vanities to statement fireplace walls, porcelain’s beauty and resilience translate throughout the home. These slabs lend themselves to cohesive, high-end design across multiple spaces.
How Does Heat Resistance Benefit These Applications?
Fireplace surrounds and bathroom counters benefit from the same heat and moisture resistance as kitchen surfaces, ensuring these installations remain flawless for years.
For homeowners who demand elegance without compromise, Quartz Blanc porcelain slab countertops offer a practical, beautiful, and enduring solution, no matter where inspiration strikes.
Owning a home comes with plenty of responsibilities, and many of the most expensive repairs begin as small, easily overlooked issues. Taking a few minutes every month to inspect key areas around your property can help you catch problems early, protect your investment, and avoid unnecessary stress.
Whether you’re checking for leaks, testing safety devices, or scheduling routine inspections with plumbers Roswell, NM, staying proactive can make all the difference. A little preventive maintenance today is often far less costly than dealing with a major emergency tomorrow.
Look for Hidden Plumbing Leaks
Water damage is one of the most common and expensive problems homeowners face. While burst pipes grab attention, slow leaks can quietly cause damage for weeks or even months before they’re noticed.
Take time to inspect under sinks, around toilets, behind washing machines, and near your water heater. Look for damp spots, discoloration, mold growth, or musty odors. Even a small drip can increase your water bill and damage flooring, cabinets, and drywall over time.
Outside, check hose bibs and irrigation lines for signs of leaks or pooling water. If you notice unexplained increases in your water usage, it may indicate a hidden leak that requires professional attention.
Inspect Your Roof and Gutters
Your roof protects everything beneath it, yet it’s easy to forget until a leak appears.
Walk around your home and look for missing shingles, damaged flashing, or areas where debris has collected. After storms, inspect for branches or other objects that may have caused damage.
Gutters deserve equal attention. Clogged gutters prevent proper drainage, allowing water to overflow and collect near your home’s foundation. Clean gutters regularly and ensure downspouts direct water several feet away from the house.
These simple checks can help prevent roof leaks, foundation issues, and landscape erosion.
Check Your HVAC System
Heating and cooling systems work hard throughout the year, especially during extreme temperatures.
Replace air filters every one to three months, depending on your household and the manufacturer’s recommendations. Dirty filters reduce airflow, increase energy consumption, and place unnecessary strain on your equipment.
Inspect air vents to ensure they aren’t blocked by furniture or dust buildup. Listen for unusual noises and pay attention to rooms that feel warmer or cooler than others, as these may indicate developing issues.
Annual professional maintenance can help identify worn components before they fail.
Examine Windows and Doors
Small gaps around windows and doors may seem harmless, but they can significantly affect comfort and energy efficiency.
Look for cracked caulk, worn weatherstripping, or visible drafts. Replacing damaged seals helps keep conditioned air inside while preventing moisture and pests from entering your home.
Check that doors and windows open and close smoothly. Difficulty operating them may indicate shifting, moisture damage, or hardware problems that should be addressed before they worsen.
Inspect Electrical Components
Electrical problems often develop gradually before becoming serious hazards.
Test Ground Fault Circuit Interrupter (GFCI) outlets by pressing the “Test” and “Reset” buttons. Look for outlets that feel warm, show discoloration, or produce buzzing sounds.
Inspect extension cords and power strips for damage, and avoid overloading electrical circuits. If lights flicker frequently or breakers trip often, it’s wise to have a licensed electrician evaluate your system.
Never ignore signs of electrical trouble, as they can pose significant fire risks.
Walk Around Your Foundation
Foundation issues rarely happen overnight, but early warning signs can save substantial repair costs.
Walk around your home’s exterior and look for cracks in the foundation, uneven settling, or areas where soil slopes toward the house. Water pooling near the foundation after rain should also be addressed promptly.
Inside, watch for sticking doors, cracked walls, or uneven floors. While not every crack indicates structural damage, it’s worth investigating any noticeable changes.
Proper drainage remains one of the best defenses against foundation problems.
Don’t Forget the Attic and Basement
These less frequently visited areas often reveal problems before they become visible elsewhere.
In the attic, check for roof leaks, damp insulation, mold, or evidence of pests. Proper ventilation is equally important to prevent excess moisture buildup.
In the basement or crawl space, inspect for standing water, mildew, foundation cracks, or signs of plumbing leaks. Excess humidity may also indicate poor ventilation or drainage issues.
Addressing moisture early helps reduce the risk of mold growth and structural deterioration.
Review Outdoor Hazards
Your home’s exterior deserves just as much attention as the interior.
Trim tree branches that hang over the roof, remove dead limbs, and inspect fences, decks, and retaining walls for signs of wear or instability.
Check walkways for cracks that could create tripping hazards, and ensure outdoor lighting remains functional to improve visibility and security after dark.
Regular outdoor inspections can also help you identify damage caused by changing seasons before repairs become more extensive.
Create a Simple Home Maintenance Routine
Preventive maintenance doesn’t require complicated schedules. Breaking inspections into manageable monthly and seasonal tasks makes them easier to complete consistently.
Consider creating a checklist that includes:
Inspect plumbing fixtures and visible pipes.
Replace HVAC filters when needed.
Clean gutters seasonally.
Examine windows, doors, and weatherstripping.
Check the roof after severe storms.
Walk around the foundation.
Inspect the attic and basement for moisture.
Review outdoor safety hazards.
Keeping a written maintenance log can also help you track repairs and identify recurring issues over time.
Conclusion
Preventive home maintenance is one of the smartest ways to protect your property, save money, and avoid unexpected emergencies. Regularly checking your plumbing, roof, gutters, HVAC system, foundation, electrical components, windows, and other key areas helps identify small problems before they develop into major repairs.
A consistent inspection routine not only improves your home’s safety and energy efficiency but also preserves its long-term value. Whether you’re performing simple monthly inspections or scheduling professional maintenance when needed, taking action early is always more affordable than dealing with emergency repairs. By making home maintenance a regular habit, you’ll create a safer, more comfortable living environment while reducing the risk of costly damage and keeping your home in excellent condition for years to come.
When your garage door opener stops working, it never seems to happen at a convenient moment. Whether you’re running late or trying to keep your home secure, knowing how to quickly troubleshoot the most common problems can save time, money, and frustration.
Understanding Common Electric Garage Door Opener Problems
The first sign of trouble is often right in front of you: your garage door refuses to budge, grinds to a halt halfway, or reverses for no obvious reason. Sometimes the unit makes odd noises or the remote control responds only intermittently. These symptoms typically point to one of three culprits: mechanical issues, electrical failures, or connectivity problems.
Ignoring early warning signs can escalate into bigger headaches. A minor alignment issue today could lead to a burnt-out motor or snapped spring tomorrow. Swift troubleshooting keeps repair costs down and ensures your home stays safe and accessible.
Comparing Types of Garage Door Openers and Their Typical Issues
Not all openers are created equal. Each type has its strengths, and its quirks.
| Opener Type | Key Strength | Common Issues | Notable Brands |
| Belt Drive | Quiet, smooth action | Belt stretching or slipping | Door Doctor, Genie |
| Wall Mount | Frees ceiling space | Wall vibration, alignment | Door Doctor |
Chain drive openers earn high marks for power, especially with heavy doors, but homeowners often complain about noise and chain maintenance. Belt drive models deliver whisper-quiet performance and require less upkeep, though belt longevity can be an issue over time. Wall mount openers redefine space efficiency but may require extra attention to mounting and alignment.
Diagnostic Techniques: Manual vs. Smart Troubleshooting Tools
Start with your senses. Listen for grinding, clicking, or buzzing. Watch for jerky movement, blinking lights, or a door that reverses without obstruction. Sometimes, simply observing your opener can pinpoint the problem area.
For newer models, smart home features make diagnostics easier. Many Door Doctor electric garage door openers come with apps that track errors, send maintenance alerts, and provide step-by-step troubleshooting guides. With a smartphone in hand, you can often find out if the issue is a sensor error, connectivity loss, or hardware malfunction before grabbing any tools.
Power and Wiring Issues: Basic Checks vs. Professional Repairs
A surprisingly high number of problems stem from power supply hiccups. Always check that the opener is plugged in and that the circuit breaker hasn’t tripped. Inspect the power cord for visible damage. If the wall switch works but the remote doesn’t, the issue may be isolated to the transmitter or batteries.
However, if you notice flickering lights, a burning smell, or repeated circuit tripping, step back. These signs suggest deeper electrical trouble that calls for a professional electrician. Never attempt complex wiring repairs, safety first.
Mechanical Problems: DIY Adjustments vs. Replacement Parts
Misalignment, worn springs, or debris in the tracks are among the most common mechanical culprits. Realign crooked tracks with gentle tapping and clear away any obstructions. Lubricate moving parts sparingly to prevent squeaks and resistance.
Some issues, such as severely worn springs or broken cables, are risky to tackle without training. When in doubt, weigh the risks of DIY against the benefits of professional repair. A quick adjustment is fine, but high-tension components should be left to experts.
Sensor and Safety Feature Troubleshooting: Automated Systems vs. Manual Overrides
Safety sensors, usually mounted near the floor, prevent the door from closing if something is in the way. Dirty sensors can cause a door to reverse unexpectedly. Wipe the lenses clean and make sure both are perfectly aligned.
Different brands take diverse approaches to safety. Some use infrared beams, while others rely on pressure sensors or advanced motion detection. If sensors remain unresponsive after cleaning, consult the opener’s manual for recalibration steps or use the manual override to secure your garage until repairs are made.
Remote Control and Connectivity Problems: Signal Interference vs. Component Failure
An unresponsive remote doesn’t always mean it’s broken. Interference from other wireless devices, drained batteries, or a need for reprogramming are often to blame. Resetting the remote, changing its batteries, or reprogramming it according to the manufacturer’s instructions can restore function.
For Wi-Fi-enabled systems, check your home network. If the opener no longer appears in your smart home app, reboot the router and ensure firmware is up to date. Persistent connection failures may indicate a faulty receiver, warranting expert attention.
Maintenance Strategies: Preventive Care vs. Reactive Repairs
Preventive maintenance beats emergency repairs every time. Inspect hardware monthly. Clean and lubricate moving parts as recommended. Test the auto-reverse function regularly to ensure safety systems work as intended.
If your opener has become unreliable, parts are no longer available, or repair costs exceed half the price of a new unit, it may be time for an upgrade. Modern models offer better security, quieter operation, and seamless smart home integration, making replacement a wise long-term investment.
Addressing issues early and understanding the basic differences between opener types can extend the life of your system and spare you from last-minute panic. For more specialized advice or to explore the latest technology, refer to resources like Door Doctor electric garage door openers to find a solution tailored to your needs.
Safety technology has advanced significantly over the past decade, giving homeowners, facility managers, and industrial operators access to highly accurate hazard detection equipment. Whether the goal is protecting a family residence, a commercial property, or a specialized worksite, selecting the right detection device requires more than simply comparing prices. A thoughtful purchasing approach ensures dependable performance when it matters most.
Understand the Detection Requirements
Before evaluating specific products, buyers should identify the type of hazard they need to monitor. Different environments present different risks, and detection equipment is designed to address particular threats. For example, enclosed spaces with fuel-burning appliances may require dedicated carbon monoxide monitoring, while industrial facilities often need multi-gas detection systems.
A quality co detector should match the conditions of the environment where it will operate. Factors such as room size, ventilation levels, and proximity to potential emission sources all influence the effectiveness of the device.
Evaluate Accuracy and Sensitivity
Detection equipment is only as valuable as its ability to identify hazards quickly and accurately. Buyers should review product specifications carefully, paying attention to sensor technology, response times, and detection thresholds.
Advanced sensors typically provide more reliable readings and reduce the likelihood of false alarms. In professional settings, consistent accuracy supports safer decision-making and minimizes unnecessary operational disruptions. Looking for devices tested under recognized industry standards can provide additional confidence in performance.
Check Alert Features and Visibility
An alarm system must communicate clearly when a hazard is detected. Audible alerts should be loud enough to attract attention, while visual indicators should remain easy to interpret under different lighting conditions.
Many modern devices feature digital displays that provide real-time readings rather than relying solely on warning sounds. This additional information allows users to monitor changing conditions and respond appropriately. Equipment with clear status indicators also makes routine inspections more efficient.
Consider Durability and Maintenance Needs
Reliability extends beyond sensor accuracy. Detection equipment often operates continuously, making durability a key purchasing consideration. Products constructed with high-quality materials tend to withstand long-term use more effectively, particularly in demanding environments.
Maintenance requirements should also be reviewed before purchase. Devices that simplify calibration, testing, and sensor replacement often reduce ownership costs over time. A dependable co detector should maintain stable performance throughout its service life while requiring straightforward upkeep.
Review Certifications and Manufacturer Reputation
Third-party certifications provide valuable insight into product quality. Equipment that complies with recognized safety standards demonstrates that it has undergone rigorous testing procedures.
Equally valuable is the reputation of the manufacturer. Companies with extensive experience in hazard detection typically invest heavily in product development, quality assurance, and customer support. Reading technical documentation, warranty details, and user feedback can reveal how well a product performs in real-world situations.
Making a More Informed Purchase
The best hazard detection equipment combines accuracy, durability, clear alerts, and trusted certification. Buyers who evaluate these factors carefully are more likely to select devices that deliver dependable protection and long-term value. A structured checklist transforms the purchasing process from a simple product comparison into a smarter safety investment.
Trees are among the most valuable features of any landscape. They provide shade, enhance visual appeal, improve outdoor comfort, and contribute to the overall character of a property. However, trees require proper care to remain healthy and safe. Without regular attention, even a beautiful tree can develop structural issues that affect both appearance and property safety.
Maintaining healthy trees is not only about preserving aesthetics-it is also about protecting homes, businesses, and the people who use those spaces every day.
The Connection Between Tree Health and Property Safety
Trees are constantly exposed to weather conditions, pests, diseases, and environmental stress. Over time, weakened branches, decaying trunks, or damaged root systems may create potential hazards.
A branch that appears stable from the ground could become vulnerable during strong winds or storms. Likewise, disease-related deterioration may progress internally before visible symptoms appear. Regular inspections allow property owners to identify concerns early and take corrective action before they become larger problems.
Healthy trees are generally stronger, more resilient, and better equipped to withstand environmental challenges throughout the year.
Improving the Appearance of Outdoor Spaces
Well-maintained trees contribute significantly to curb appeal. Their shape, color, and structure add depth and visual interest to landscapes while creating a more inviting atmosphere.
Pruning and maintenance help trees retain an attractive appearance while encouraging healthy growth. In neighborhoods where property presentation influences overall value, tree care often plays a major role in maintaining a polished and well-kept landscape.
When outdoor spaces look organized and balanced, the entire property benefits from a stronger visual impression.
Supporting Long-Term Landscape Health
Trees interact with nearly every element of a landscape. They provide shade for lawns, influence soil conditions, and contribute to local ecosystems. When trees experience health problems, those effects may extend to surrounding plants and outdoor features.
Property owners seeking professional tree services lynn ma often focus on preserving mature trees because replacing them can take years or even decades. Proper care helps maximize the lifespan of existing trees while supporting the overall health of the landscape.
This proactive approach reduces the likelihood of unexpected problems and contributes to a more stable outdoor environment.
Preventing Costly Property Damage
Unhealthy trees can pose risks to structures, driveways, fences, and utility lines. Falling branches or unstable trees may result in expensive repairs, particularly during severe weather events.
Routine assessments and maintenance help identify vulnerabilities before damage occurs. Through professional evaluations, potential issues such as dead limbs, structural weaknesses, or disease-related decline can be addressed in a timely manner.
For property owners researching tree services lynn ma, safety considerations are often a major factor when planning long-term landscape maintenance.
Investing in a Stronger Outdoor Environment
Healthy trees enhance both the beauty and functionality of a property. They create welcoming outdoor spaces, contribute to environmental benefits, and strengthen overall landscape value.
With regular care and attention, trees remain an asset rather than a liability. A thoughtful tree maintenance strategy supports safety, preserves curb appeal, and helps ensure that outdoor spaces continue to thrive for years to come.
Flooring is one of the most vulnerable-and expensive-elements in any construction or renovation project. Whether it’s elegant hardwood, polished marble, or durable tile, these surfaces can easily suffer from scratches, stains, and impact damage during heavy work.
Floor protection films offer a practical, cost-effective solution to preserve these surfaces, ensuring they remain in pristine condition from start to finish.
What Are Floor Protection Films?
Floor protection films are temporary, self-adhesive coverings designed to shield floors from damage during construction, remodeling, or maintenance. Made from materials like polyethylene (PE) or polypropylene (PP), these films adhere securely to surfaces without leaving residue upon removal.
They act as a protective barrier against common hazards such as:
Foot traffic and heavy equipment
Dust, debris, and paint spills
Moisture and chemical exposure
Scratches and abrasion
Unlike traditional coverings like cardboard or drop cloths, temporary protection films stay firmly in place and provide consistent coverage.
Why Floor Protection Matters
During renovation projects, flooring is exposed to continuous wear. Workers, tools, and materials move across the space, increasing the risk of damage. Without proper protection, even minor incidents can lead to costly repairs or replacements.
Hardwood floors can dent or scratch easily, tile grout can absorb stains, and marble surfaces are prone to etching and discoloration. Floor protection films minimize these risks while keeping the job site clean and professional.
Protecting Different Types of Flooring
Hardwood Floors
Hardwood floors require special attention due to their sensitivity to moisture and impact. High-quality protection films provide:
Scratch and dent resistance
Breathable designs to prevent moisture buildup
Easy removal without adhesive residue
Using the right film ensures the natural finish of the wood remains intact throughout the project.
Tile Floors
Tile surfaces are durable but not immune to damage. Grout lines are especially prone to trapping dirt and stains. Protection films help by:
Preventing dust and debris from settling into grout
Shielding against paint spills and adhesive splashes
Providing a non-slip surface for safer movement
This keeps tiled areas clean and reduces post-project cleaning time.
Marble Surfaces
Marble is highly sensitive to scratches, chemicals, and acidic substances. Even light contact with tools or debris can leave permanent marks. Floor protection films designed for marble offer:
Gentle adhesion to avoid surface damage
Resistance to liquid penetration
Protection from chemical exposure and staining
This is especially critical for high-end residential and commercial projects where appearance is paramount.
Key Features to Look For
Not all floor protection films are created equal. Selecting the appropriate product should be based on the flooring material and the specific conditions of the project. Important features include:
Strong but safe adhesion: Stays in place without damaging the surface
Tear resistance: Withstands heavy foot traffic and equipment
Water resistance: Prevents moisture penetration
Slip resistance: Enhances job site safety
Easy application and removal: Saves time and labor costs
Some advanced films also offer UV resistance, allowing them to remain effective even in areas exposed to sunlight.
Best Practices for Application
To maximize effectiveness, proper installation is essential:
Clean the floor thoroughly before applying the film
Ensure the surface is clean and moisture-free, with no dust or greasy residue present
Apply the film evenly, avoiding air bubbles or wrinkles
Overlap edges slightly for full coverage
Inspect regularly and replace damaged sections if needed
Following these steps ensures consistent protection throughout the project.
A Smart Investment for Any Project
Floor protection films are a small investment that delivers significant returns. By preventing damage, reducing cleaning time, and maintaining the quality of flooring materials, they help contractors and homeowners avoid unnecessary expenses and delays.
In today’s fast-paced construction environment, safeguarding surfaces is not optional-it’s essential. Floor protection films provide a reliable, efficient solution to protect hardwood, tile, and marble floors, ensuring they look as flawless at project completion as they did at the start.
Residential properties built in the mid-20th century frequently incorporated materials containing asbestiform minerals due to their heat resistance and durability. While these minerals were considered a standard construction component for decades, historical usage patterns often left toxic residues in the very structures where families reside. Gaining a professional understanding of these risks is essential for modern homeowners planning updates or structural modifications. Effective management begins with recognizing the presence of these materials and minimizing opportunities for them to enter the living environment.
The history of asbestos in building materials
During the peak of its industrial use, developers utilized asbestos for its fire-retardant properties and low cost. It was integrated into cement, tiles, and insulating products across a vast array of architectural styles, creating a lasting legacy in the built environment that persists today. Because these materials were applied so pervasively, they remain hidden in countless homes that have not undergone thorough renovations.
Health risks associated with fiber inhalation
When asbestos-containing products are handled, cut, or crushed, microscopic fibers can be released into the environment, posing significant health risks if inhaled. These fibers are durable and can accumulate in lung tissues, potentially leading to chronic illness, scarring, or malignant conditions over long durations. Given that no exposure level is deemed safe for human health, prioritizing air quality is a strictly observed standard in building evaluation.
Why homes built before the 1980s are at higher risk
Properties constructed before the 1980s are statistically more likely to contain legacy materials that were heavily reliant on asbestiform additives. The regulatory climate shifted significantly in the 1970s, but older homes often retain their original flooring, roofing, and insulation systems. If you own an older home, it is a prudent practice to consider conducting professional assessments before modifying any structural elements or interior surfaces.
The importance of avoiding disturbance of suspect materials
Disturbing established materials that may contain asbestos risks liberating hazardous fibers, transforming inert components into an airborne danger. To protect occupants, homeowners should follow a cautious approach to maintenance and repairs. By ensuring suspect areas remain intact and properly sealed, the potential for exposure is eliminated. Consider these items to identify potential areas of concern:
Attic and wall insulation commonly containing vermiculite
Flooring tiles secured with older mastic adhesives
Textured ceiling finishes and joint compounds
Exterior cladding systems or siding materials
By following these identification strategies, property owners maintain a secure environment before choosing to engage a service like AsbestosClear for comprehensive site assessments.
Identifying common materials that contain asbestos
Identifying materials suspected of containing asbestos relies on recognizing specific construction eras rather than visual cues alone. Since many of the most common products mimic standard gypsum or vinyl building supplies, homeowners often lack the visual data necessary for confirmation. Relying on an expert assessment prevents accidental exposure during renovation or general maintenance tasks. Utilizing companies like SafeSpace Testing often ensures that these materials are properly identified during pre-maintenance inspections.
Flooring components like vinyl tiles and adhesives
Many vinyl floor tiles and the resilient adhesives used to bond them historically contained asbestos fibers to improve flexibility and adherence. Replacing these floors during a renovation requires awareness, as scraping or removing the adhesive layer can release fibers directly into the surrounding air. Homeowners should approach carpet removal or tile replacement in older kitchens and mudrooms with extreme caution.
Insulation types including pipe lagging and vermiculite
Insulation found within pipes or attics often poses the highest risk if left in a friable state or if the material begins to deteriorate. Vermiculite, a granular insulation, potentially contains asbestos contaminants, making it a critical area for inspection if it is currently exposed in attic spaces. Professional handling is the only safe standard when assessing or disturbing these insulation types.
Roofing, siding, and external cladding materials
Exterior building envelopes, including cementitious siding shingles and roofing felts, frequently utilized mineral fibers to withstand weathering and structural impact. Though these materials are often considered non-friable when in sound condition, their removal or destruction creates an environmental hazard. Specialized contractors are required to address these elements to prevent uncontrolled release during exterior remediation.
Textured ceilings and joint compound applications
Decorative ceiling treatments, often described as popcorn ceilings, and the joint compounds used on drywall frequently contained raw fibers to provide texture and fire resistance. These surfaces can shed dust over time even without direct impact, especially as houses settle or age. If you suspect these materials are present, refrain from sanding or drilling into the surface until documentation confirms the composition.
When to perform professional testing before renovations
Planning a renovation project creates a unique situation where building materials must be disturbed to achieve the desired outcome, necessitating a clear safety strategy. Even minor tasks, such as replacing light fixtures or patching walls, can introduce enough dust to compromise residential air quality if asbestos is present. Engaging a provider like PureAir Labs offers verification, ensuring that the necessary precautions are taken prior to a project commencing. Testing effectively shifts the risk management process from guesswork to a data-driven approach.
How remodeling activities increase airborne contamination risks
Activities like power drilling, sawing, and demolition generate fine particulates that can easily carry potentially hazardous fibers throughout a dwelling. Without professional containment or assessment, these activities transform static building components into dynamic respiratory hazards. Understanding the link between physical disturbance and particle release is the core requirement for safe home improvement.
Distinguishing between household maintenance and major demolition
Routine maintenance, such as changing hardware, often involves minimal impact and poses fewer risks than major structural modifications or demolition. Understanding whether a project constitutes superficial maintenance or deep intervention helps determine if professional testing is legally and logistically necessary. Categorizing the project scale correctly ensures that safety precautions are appropriately tailored to the specific level of intervention.
Determining when a DIY approach is insufficient for safety
Attempting to collect samples or manage remediation without professional training often increases the danger to all occupants. Professional testing requires standardized extraction methods and high-efficiency particulate air (HEPA) equipment that typical DIY toolkits lack. A home asbestos guide provides clarity on when to step back and invite a licensed technician into the property to handle sample acquisition safely.
Evaluating the impact of renovation scale on liability
Major renovations change the physical landscape of a home, bringing significant legal and financial responsibilities if material hazards are mishandled. If contractors uncover hidden asbestos during a project, the delay and management costs can escalate if plans were not adapted early on. Proactive asbestos hazard awareness helps protect property owners from unforeseen liability and health-related repercussions after a project has finished.
Steps for professional asbestos inspection and sampling
Professional inspection is the process of locating, identifying, and quantifying potentially hazardous materials through rigorous field analysis. An inspector systematically maps the home, checking areas that match the profile of common hazardous construction for that era. By following established protocols, these experts document the presence of fibers without risking their own safety or that of the household. Referencing an asbestos testing checklist allows for transparency during the inspection process.
Selecting a certified asbestos building inspector
Certification ensures that the individual possesses the technical training to identify suspect materials and follow legally mandated sampling protocols. Homeowners should verify credentials to ensure the inspector adheres to local and regional safety regulations before scheduling an appointment. A qualified inspector brings essential tools for evaluating material composition and site-specific hazards accurately.
The process of non-destructive visual assessment
Initial inspection begins with a visual overview to assess the condition of materials and determine if sampling is necessary. Inspectors look for physical degradation, fiber exposure, and signs of past interference, keeping the structural components as undisturbed as possible during this stage. The result of this assessment informs the final testing strategy and provides the groundwork for any future management plan.
Maintaining containment during material sampling
When a material sample must be collected for lab submission, professionals utilize small-scale containment to ensure that internal air quality remains completely unimpacted. This approach prevents fibers from migrating to other parts of the home during the extraction interval. Strict adherence to industry safety standards remains a core requirement for any technician collecting samples from established materials.
Logistics for submitting samples to accredited laboratories
Once samples are safely secured, they are tracked via a chain of custody and transported to an accredited facility for definitive microscopic analysis. The laboratory processes these samples using standardized analytical techniques to determine the concentration and type of mineral present. Providing valid laboratory data is the only reliable way to clear a workspace for subsequent construction activity.
Interpreting laboratory results and managing hazards
Laboratory results represent the final check to determine if a material falls within the regulated category of asbestos-containing material. Understanding the data provided in these reports is essential for making informed decisions on whether to remove or contain the hazard. If the report comes back indicating asbestos test results, the property owner must follow prescribed abatement paths based on the material’s specific condition.
Understanding the threshold for regulated asbestos materials
Regulatory standards dictate specific percentages of asbestos content that trigger mandatory compliance and remediation procedures. Materials below this threshold might still require care, but they fall outside the strictest abatement requirements. Reviewing these threshold levels with an expert ensures that management strategies remain compliant and effective for the specific project needs.
Recognizing the difference between friable and non-friable materials
Friable materials can be crushed or reduced to powder by hand pressure, which makes them highly prone to releasing fibers into the air. Non-friable materials are bound in a matrix that prevents fiber release unless they are mechanically damaged, sawed, or abraded. This classification often dictates whether the material can be encapsulated in place or if it must be fully removed.
Options for managing asbestos in place
If the material is intact and not likely to be disturbed by future living activities, in-place management is often a valid and safe recommendation. This approach involves monitoring the status of the material periodically to ensure no decay or damage occurs over time. Keeping materials enclosed is an effective method for minimizing occupant exposure risk when remediation isn’t strictly necessary.
Deciding between encapsulation and professional removal
Encapsulation involves applying a seal to the surface of the material, which creates a protective barrier that locks fibers in place. If encapsulation is impractical due to extensive damage, professional removal becomes the primary method for ensuring long-term safety. A home safety guide helps clarify the professional decision-making process when comparing these two remediation paths.
Legal requirements and compliance for asbestos abatement
Navigating the legal landscape requires clear documentation of all diagnostic and removal activities to remain compliant with state and federal regulations. While some regions allow homeowners to manage their properties with fewer restrictions, professional intervention is often governed by strict notification and disposal laws. Failure to comply with these records requirements can complicate property resale or insurance validation. Each step of the abatement process must be handled by licensed entities to ensure that legal safety requirements are met.
Understanding local and state notification requirements
Notification protocols are in place to ensure that environmental agencies are informed before significant abatement begins, which helps protect the surrounding community from exposure. Depending on the scale of the project, contractors are often required to file documentation far in advance of the start date. Homeowners must ensure their contractors handle these administrative tasks to maintain a full record of compliance.
Roles and responsibilities of licensed abatement contractors
Licensed abatement contractors are legally tasked with executing the project according to approved remediation plans and safety guidelines. Their responsibilities include setting up negative pressure environments, using professional-grade personal protective equipment, and isolating the workspace from unaffected parts of the home. By assuming these tasks, the contractor ensures that the safety measures are properly implemented throughout the duration of the work.
Documentation needed for property records and resale
Comprehensive documentation, including laboratory analysis reports and clearance letters, constitutes the permanent legal record for a healthy building. These records serve as evidence of proper remediation, which becomes crucial when providing disclosures during a property sale or real estate transaction. Archiving these documents in the official property file protects future owners and confirms the home was handled with professional care.
Managing waste streams according to environmental regulations
Asbestos-containing waste must be handled and disposed of in specialized facilities that are equipped to bury or encapsulate it safely. Regulations strictly forbid disposing of this hazardous waste in standard residential trash systems or local landfills. Certified abatement contractors coordinate the logistics for authorized waste transport, ensuring that the legacy material is permanently and safely removed from the property site.
A storm shelter costs $3,000 to $13,000 for most homeowners, with the national average around $7,500 according to Angi and HomeAdvisor data. Small under-bed shelters start as low as $2,100. Above-ground prefab safe rooms run $2,600 to $8,000. Underground backyard shelters run $4,000 to $15,000 typical, with large or complex installations reaching $30,000+. Custom basement safe rooms fall in similar ranges. The wide variance reflects five genuinely different shelter types serving different needs, not pricing inconsistency.
The bigger question for most tornado-alley and hurricane-zone homeowners isn’t what a shelter costs — it’s whether the shelter you’re considering actually meets FEMA P-320/361 standards. A “storm shelter” that isn’t FEMA-rated is a glorified storage shed that can fail catastrophically in a major tornado. This guide breaks down what each shelter type actually costs, how to verify a shelter meets life-safety standards, and the regional and timing factors that affect what you’ll actually pay.
A note on timing before we get to numbers
Storm shelter prices rise meaningfully after major tornado events. Following any significant outbreak in tornado alley, contractor demand spikes, manufacturer lead times stretch from weeks to months, and prices climb 15-30% across the market. This is documented across the industry and explicitly acknowledged by reputable manufacturers.
The practical implication: plan and purchase a storm shelter proactively, before you need it, not reactively after a close call. Off-season ordering (late fall through early spring in most tornado-prone regions) gets you better pricing, faster installation, and less pressure to make rushed decisions. A shelter you order in November installed in February costs less than the same shelter ordered in May after a tornado outbreak.
Five shelter types, five different price points
Storm shelter cost by type
Storm shelter pricing is structured primarily around the shelter type and installation method.
Type 1: Bed-style / under-bed shelter — $2,100 to $4,500.
Steel cage that fits under or replaces a standard bed, designed for two adults to lie inside during a storm. Bolted to the floor structure. The smallest and most affordable option. Best for renters, apartments, or homes where larger installations aren’t feasible. FEMA-rated models exist; verify before purchase. Limited capacity is the main drawback — appropriate for individuals or couples but not families.
Type 2: Above-ground prefab safe room — $2,600 to $8,000.
Steel-reinforced concrete or all-steel structure delivered as a complete unit and bolted to a concrete pad in a garage, basement, or other interior space. Most common entry-level family shelter. Typically holds 4-8 people. Installation takes one day. Best for: garages on slab foundations, basements with adequate floor support, properties where underground installation isn’t viable due to soil or water table.
Type 3: Garage shelter (above or below ground) — $3,000 to $15,000.
A specific case worth its own category because garage installation is the most common location. Above-ground in the garage runs $3,000-$9,000; below-ground beneath the garage floor runs $10,000-$15,000. Both have advantages: easy access from inside the home, no need to go outside during the storm, and dual-use space when not in shelter mode.
Type 4: Backyard underground shelter (precast concrete or steel) — $4,000 to $15,000 typical, up to $30,000.
Buried in the yard with a hatch entrance at ground level. Precast concrete is the most common material and ships finished, ready to install in one day. Steel options exist with similar pricing. Higher-end installations include reinforced doors, ventilation systems, lighting, and integrated communication. Best for: properties with soil and water table conditions that support underground installation, homeowners wanting maximum protection separate from the house structure.
Type 5: Custom basement safe room or large in-ground — $6,000 to $30,000+.
Built into existing basement space or as a large dedicated underground installation. Custom engineering, larger capacity (10-20 people), often includes amenities for hurricane-zone use where occupancy may extend for many hours. Highest-end residential category. Common for hurricane shelters in coastal markets and for homeowners who want shelter capacity for extended family or neighbors.
National pricing data from Angi and HomeAdvisor lands at $7,643 average, with most homeowners spending between $2,892 and $13,281. That average covers types 2 through 4 — the most commonly purchased categories. Type 1 (bed shelters) skews the low end of the market; type 5 (custom large installations) skews the high end.
FEMA P-320/361 standards: what they actually mean
Before purchasing any shelter, understand the certification framework. FEMA publishes specific engineering standards for residential and community storm shelters.
FEMA P-320: Taking Shelter From the Storm is the residential safe room standard. Shelters meeting this specification are engineered to withstand EF5 tornado winds (up to 250 mph) and the impact of debris traveling at hurricane and tornado wind speeds. The standard specifies wall construction, anchoring requirements, door specifications, ventilation, and minimum interior dimensions.
FEMA P-361: Design and Construction Guidance for Community Safe Rooms applies to larger community shelters but the engineering requirements parallel residential standards.
ICC 500 is the parallel standard from the International Code Council. Shelters certified to ICC 500 meet effectively equivalent requirements to FEMA P-320/361.
When evaluating a storm shelter:
Verify the shelter is rated to one of these standards. Reputable manufacturers will display certification clearly. “Tornado-resistant” without specific certification is marketing language, not engineering.
Verify installation matches the certification. The certification covers the shelter as designed and properly installed. Cutting corners on the concrete pad anchoring (above-ground) or excavation reinforcement (underground) can void the protection the rating implies.
Verify the door specifically. The door is the most-tested component because it’s the weakest point. FEMA-rated doors have specific impact ratings, latch mechanisms, and frame requirements.
Shelters not meeting these standards can fail in major tornadoes. The price difference between a FEMA-rated shelter and a non-rated “storm-resistant” structure is typically $500-$1,500. Worth the difference for any homeowner taking storm shelter seriously.
Above-ground vs. underground: which fits your situation
Above-ground vs underground storm shelter decision framework
Both options provide FEMA-rated protection when installed correctly. The choice between them is driven by site conditions and practical considerations, not safety.
Choose above-ground when:
High water table makes underground installation impractical
Frequent flooding in your area (you don’t want shelter accessible only by walking through flood water)
Mobility considerations — anyone in the household has difficulty with ladders or stairs
Slab foundation home with no basement and limited yard space
You want quick access without stepping outside during severe weather
Lower upfront cost matters
Choose underground when:
Excellent soil conditions and low water table
Maximum protection from both wind and debris is the priority (underground shelters are inherently better protected from flying debris)
You have yard space and don’t want shelter taking up garage or interior space
Long-term durability matters (concrete underground shelters can last 75-100 years)
Aesthetic — underground shelters are nearly invisible when not in use
Climate-specific considerations:
Tornado alley (Oklahoma, Kansas, Texas, Missouri, Arkansas, Alabama, Mississippi, Tennessee): Both types work; above-ground is increasingly popular for accessibility reasons. Tornado warnings give 8-15 minutes of lead time, so quick access is more important than extended occupancy comfort.
Hurricane zones (Gulf Coast, Florida, Atlantic Coast): Above-ground is generally preferred because hurricane shelters need to remain accessible during extended periods of high water. FEMA P-361 specifies 10 sqft per person for hurricane shelters versus 5 sqft per tornado shelter because occupancy time runs hours to days rather than minutes.
Mixed-threat areas: Many areas in the Southeast face both tornado and hurricane risks. Above-ground shelters work well for both threats; underground shelters can flood during hurricane storm surge.
The honest framework: if soil and water table allow underground installation and accessibility isn’t a concern, underground delivers slightly better debris protection and longer lifespan. If those conditions don’t apply, above-ground delivers equivalent protection with significantly easier access and lower cost.
Material comparison: concrete vs. steel vs. fiberglass
Storm shelter material comparison with lifespan and use cases
Three primary materials for storm shelters, each with different cost, lifespan, and characteristics.
Concrete (precast or poured-in-place) — $3,500 to $8,000 installed
The most common material for both above-ground and underground shelters. Heavy, extremely durable, excellent debris protection due to mass. Lifespan 75-100+ years for properly cast concrete. Drawbacks: shipping cost is high due to weight, installation requires heavy equipment (crane or large excavator), repairs of any cracks or damage are difficult.
Steel — $4,500 to $20,000 installed
Welded steel construction, often with internal reinforcement. Wide range of sizes available from 2-person to 12+ person. Lighter than concrete but passes the same FEMA tests when properly engineered. Lifespan 30-50 years before corrosion becomes a concern, longer with proper coating maintenance. Drawbacks: higher cost than concrete for equivalent capacity, requires periodic inspection for rust.
Fiberglass — $4,700 to $10,000 installed
Composite construction with internal reinforcement. Lightweight, completely corrosion-proof, smooth interior surface. Common for underground installations because the lighter weight simplifies installation. Drawbacks: higher cost than basic concrete, more limited size options, repairs require specialized work.
Other materials worth knowing about:
Cinder block (typically homeowner-built): $3,150-$6,500. Cheaper but more vulnerable to high winds and water than reinforced alternatives. Most cinder block shelters don’t meet FEMA P-320 standards.
Wood-frame with steel reinforcement: $3,000-$4,500. Texas Tech University research shows properly engineered wood shelters with masonry or steel infill can resist tornado-force winds. Cost-effective but requires specific engineering.
Polyethylene (plastic): Used in some prefab products. Lower cost than concrete or steel but with shorter lifespan and more limited size options.
For most homeowners, the practical decision is concrete for value and durability, steel for design flexibility and underground access (the lighter weight matters), or fiberglass for corrosion-resistance in coastal or high-water-table areas.
What’s not in the headline price
Several costs commonly fall outside the basic shelter quote.
Excavation (for underground shelters): $1,500 to $5,000
Includes digging, removal of excavated soil, and base preparation. Rocky soil or limited site access can push costs higher. The shelter manufacturer often quotes the unit-only price; excavation and installation are separate.
Concrete pad (for above-ground shelters): $500 to $2,000
A reinforced slab to anchor the shelter. Some installations use the existing garage floor; some require new pad construction. The pad is critical because anchoring failure is one of the most common shelter failure modes.
Permits and inspections: $50 to $200 typically
Most jurisdictions require permits for storm shelter installation. Some areas in tornado alley have streamlined permitting; others require full structural review.
Electrical and ventilation: $300 to $1,500
Lighting, ventilation fans, and emergency communications. Some prefab shelters include basic electrical; others require separate electrician work. Battery backup systems add $200-$500.
Door upgrades: $200 to $1,500
Premium FEMA-rated doors with multi-point latching, easier interior release, or specific impact ratings.
Site preparation and access: variable
Removing landscaping for underground installation, providing crane access, or grading the area. A typical project includes $500-$2,000 in preparation work that’s often quoted separately from the shelter itself.
A typical complete budget for a backyard underground precast concrete shelter for a family of four lands around $8,000-$12,000 installed and ready to use. Above-ground options for similar capacity run $5,000-$9,000. Significantly cheaper quotes typically exclude one or more of the line items above.
Tax credits, rebates, and financing
Several states and federal programs offset storm shelter costs significantly.
State tax credits
Several tornado-prone states offer specific tax credits or deductions for storm shelter installation. Programs vary by state and change frequently — verify current programs through your state’s emergency management agency or department of revenue:
Alabama has offered storm shelter income tax credits at various points
Mississippi has provided sales tax exemptions for shelter purchases
Oklahoma has offered Storm Shelter Rebate programs through the state’s emergency management
Other tornado alley states have intermittent programs
FEMA Hazard Mitigation Grant Program (HMGP)
After federally declared disasters, FEMA sometimes offers grants covering up to 75% of storm shelter costs in affected areas. These programs are time-limited following each disaster declaration.
Local rebate programs
Some counties and municipalities in tornado alley offer rebate programs. City of Moore, Oklahoma (after the 2013 EF5 tornado) ran a notable program. Check with local emergency management offices.
Insurance discounts
Some insurers offer homeowners insurance discounts for FEMA-rated storm shelters, typically 5-15% on the dwelling premium. Discount varies significantly by insurer and state.
Financing options
Storm shelters are commonly financed through home equity loans, HELOCs, or manufacturer financing. Many established storm shelter companies offer 6-24 month payment plans. Total interest cost on a $7,500 shelter financed at 8% over 24 months adds approximately $640.
The combination of tax credits, rebates, and insurance discounts can offset 20-40% of total cost in some jurisdictions. Worth investigating before assuming the sticker price is your final cost.
Sizing: how much capacity do you actually need
FEMA provides specific square-footage guidance:
Tornado shelters: 5 square feet per person standing
Tornado warnings give 8-15 minutes of advance notice and the actual storm passes in minutes. Standing capacity for short occupancy is the design standard. A family of four needs 20 sqft minimum; a typical 4×6 shelter at 24 sqft is appropriate.
Hurricane safe rooms: 10 square feet per person
Hurricane occupancy may run hours or days. Seating capacity, supplies storage, and basic accommodations are design considerations. A family of four needs 40 sqft minimum; an 8×8 or 6×8 shelter is appropriate.
Add capacity for:
Mobility-impaired family members (wheelchair access requires more room)
Pets (typically 5-10 sqft per medium-large pet)
Supplies and emergency equipment
Comfort during extended hurricane occupancy
Don’t oversize unnecessarily
Larger shelters cost more, take more space, and don’t add safety beyond meeting FEMA standards. A 4-person family doesn’t benefit from a 12-person shelter.
A practical approach: count people and pets, multiply by FEMA standard for your storm type, add 20-30% buffer, choose the next size up from manufacturer offerings.
DIY: not recommended for storm shelters
Storm shelters are one category where the consequences of failure are extreme. A failed roof during a tornado kills people. A failed shelter during a tornado kills people who thought they were safe.
The honest assessment: DIY storm shelter construction requires specific structural engineering, FEMA-rated materials, and proper installation that homeowners typically can’t replicate. The “FEMA booklet” approach mentioned in some online sources gives general guidance but doesn’t substitute for professional engineering review of your specific design.
If budget is the primary constraint, the right answer is usually a smaller FEMA-rated prefab shelter rather than a larger DIY structure. A $3,000 FEMA-rated bed shelter provides genuine EF5-rated protection. A $1,500 DIY cinder block “shelter” provides false confidence and possible fatal failure.
What homeowners can reasonably DIY: site preparation, landscaping around the installed shelter, interior outfitting (shelving, supplies, lighting if not factory-installed), and routine inspection and maintenance. The shelter itself should be manufacturer-built and professionally installed.
Frequently asked questions
How long does storm shelter installation take?
Above-ground prefab installation: 1 day. Underground precast concrete installation: 1-2 days. Custom basement or large in-ground installation: 1-2 weeks. Pre-installation lead time (manufacturing, scheduling, permit) typically runs 4-12 weeks during normal periods, longer following major tornado events.
Will my homeowners insurance cover a storm shelter?
Generally no for installation costs — shelters are considered improvements/maintenance, not covered losses. Yes for damage to existing shelters from covered perils. Some insurers offer 5-15% premium discounts for FEMA-rated shelters; ask your insurer specifically.
Do I need a permit for a storm shelter?
Most jurisdictions yes, especially for underground installations or installations affecting structural elements. Some areas in tornado alley have streamlined permitting specifically for storm shelters. Check with local building department before installation. Permit fees typically $50-$200.
Can I install a storm shelter in a rental home?
Generally only with landlord permission, and modifications often need to be removed at lease end. Bed-style shelters are the most rental-friendly option because they’re freestanding rather than installed. Some renters install bed shelters and take them when they move.
What about HOA restrictions?
Many HOAs have rules about visible structures (which can affect above-ground shelters). Federal storm shelter laws don’t override HOA restrictions, but some states have specific protections — check your state’s regulations. Underground shelters with low-profile hatches are typically less HOA-restricted than visible above-ground units.
Should I get the shelter inspected after major storms?
Yes, after any significant weather event. Concrete shelters check for cracks. Steel shelters check for door function and any visible deformation. Underground shelters check for water intrusion. Most manufacturers recommend annual inspection regardless of storm activity.
Will my storm shelter need maintenance?
Concrete shelters: minimal — annual visual inspection. Steel shelters: door hinges and latches lubricated annually, coating inspected for rust every 2-3 years. Underground shelters: drainage and ventilation checked annually. Total annual maintenance time and cost: 1-2 hours and $0-$50 in supplies.
What’s the difference between a tornado shelter and a hurricane shelter?
Engineering standards are similar (FEMA P-320/361 covers both). Sizing is different — hurricane shelters need 10 sqft per person versus 5 sqft for tornadoes because occupancy time is longer. Hurricane shelters typically include amenities for extended occupancy (lighting, ventilation, water storage, sanitation considerations).
Can I add a storm shelter to my existing basement?
Yes, basement safe rooms are a common installation type. Existing basement floors typically support the additional weight, but a structural review is worth doing for larger installations. Custom basement safe rooms run $6,000-$15,000 depending on size and amenities.
What if I can’t afford a storm shelter right now?
Several real options. Smaller FEMA-rated bed shelters start around $2,100. Manufacturer financing typically offers 12-24 month payment plans. State rebate programs and FEMA grants reduce cost in some areas. Until you can install one, identify the safest interior space in your home (interior bathroom, central closet, basement corner) and treat it as your designated shelter for severe weather warnings.